Installing Maya 4.5
“A new generation of children will bring order to this age.”
For making and exporting Killer7 models into a file format that the game can read (.dat), an ancient version of Maya is required. If you think you got the skills needed to make a plugin for exporting in Blender, please contact us at The Smith Modding Community.
Virtual Machine (Recommended)
Due to newer windows versions and newest graphics drivers having several problems with Maya 4.5, along with the installation process for Maya 4.5 being cumbersome, a virtual machine with Maya already preinstalled on an older version of windows has been created, and is the currently recommended way of using Maya.
You can download it from here (~230 MB DL size, ~300 MB installed):
Download Maya 4.5 VM
Instructions
- Download the VM
- Install VirtualBox
- In the "Tools" section in VirtualBox, click on "Import"
- Select the "MayaSmith.ova" file you downloaded
-
Set "MAC Address Policy" to "Include all network adapter MAC addresses" and turn off "Import hard drives as VDI"
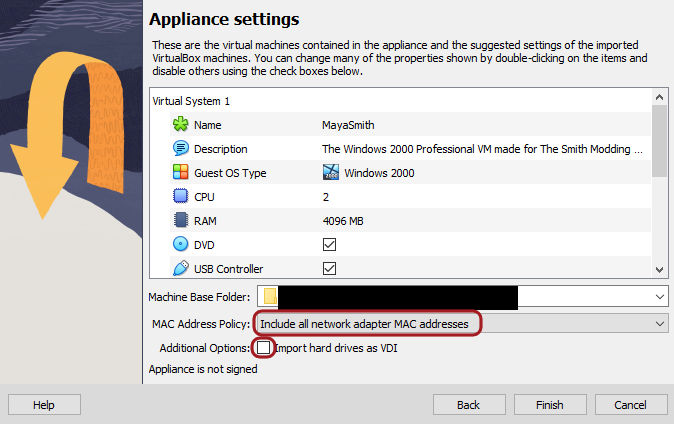
-
Click on Finish
Post-Install
If you get a "New Hardware Wizard" popup on your first launch, you can spam "Next" through it and then restart with no worries.
For easier access to files on your actual PC, you should enable Shared Folders in the settings of the virtual machine.
Troubleshooting
- Maya shows an activation screen on launch!
- The MAC address for the machine was probably re-generated. Check that the MAC address is "DEFACEDBABE7" in the settings of the VM. If it isn't, you should re-import the VM, and make sure that the "MAC Address Policy" is set to "Include all network adapter MAC addresses"
Manual Installation
If you want to test your luck, these are the steps for installing Maya 4.5 on your PC.
Download links:
Download Maya 4.5
Download Plugin
Instructions
- Download Maya 4.5 and the plugin
- Extract the Maya 4.5 iso to any folder
- Install Maya
- Run "setup.exe" in <EXTRACTEDISO>\Maya
- Click "Next" on the first two screens (User Name does not matter)
- Choose "Maya Unlimited" and "Full", then click "Next"
- Click "Next" on the "Add Location to Path" screen
- Click "Install"
- You can skip the Shader Library installation
- Skip Licensing, then "Next"
- Finish
- In the Start menu, find and launch "FlexLM Licnese Utilities"
- Should be in the "AliasWavefront\Common Utilities" folder in Start menu, if you've got those
- The EXE should also be in "C:\Program Files (x86)\Common Files\AliasWavefront Shared\Licensing\bin\lmtools.exe"
- Go to the "System Settings" tab and find your 12-digit hex code in "Ethernet Address"
- If there are several codes, use the first one
- Edit the "aw.dat" file in <EXTRACTEDISO>\Crack#1
- Change the "HOSTID=XXXXXXXXXXXX" line to have your 12-digit hex code
- Example: HOSTID=5ef6a085acb3
- There should be NO quotes!
- Save the file
- If an error saying that the file is read-only pops up, save to a different file like "aw_new.dat", then delete the original "aw.dat", and finally rename your new file to "aw.dat"
- Open the Command Prompt in the "Crack#1" directory
- Easy way to do so is to open the directory in the File Explorer, then press Alt+D, type in "cmd", and press Enter
- In the Command Prompt, run:
awkeygen aw.dat- Make sure that the aw.dat file was correctly updated and there are no other files in the folder other than aw.dat. The file now should have in the line "FEATURE MayaUnltd..." a unique code specific to your hostid
- Example: FEATURE MayaUnltd sgiawd 4.500 permanent uncounted 3574BA8BCE85 \
- Create a folder in your C: disk called "FLEXlm"
- Copy the "aw.dat" file into it
- So, in the end it should be "C:\FLEXlm\aw.dat"
- In the Start menu, find and launch "Install License"
- Should be in the "AliasWavefront\Common Utilities" folder in Start menu
- The EXE should also be in "C:\Program Files (x86)\Common Files\AliasWavefront Shared\Licensing\bin\installKey.exe"
- Click "Browse...", and select your "C:\FLEXlm\aw.dat" file
- Click "Install"
- A popup saying "A License was found, and successfully installed!" should appear, you can click OK and close the window
- Launch Maya
- Maya should now launch without any errors. If there are any errors on launch (but NOT the activation screen), you can try installing older graphics drivers
- If you have no errors, you can proceed
- Close Maya
- Extract "pack.exe" from the plugin archive to C:
- So, it should be "C:\pack.exe"
- Extract "SdExp.mll" and "SdExpCmd.mll" from the plugin archive to "C:\Program Files (x86)\AliasWavefront\Maya4.5\bin\plug-ins"
- Extract "SdExpOptions.mel" from the plugin archive to "C:\Program Files (x86)\AliasWavefront\Maya4.5\scripts\others"
- Launch Maya
- In the toolbar, open "Window -> Settings/Preferences -> Plug-in Manager..."
-
Set "SdExp.mll" and "SdExpCmd.mll" to "☑ loaded" and "☑ auto load"
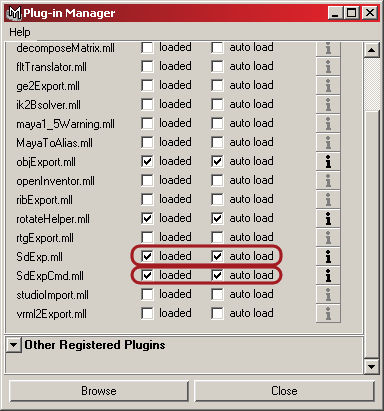
-
Click "Close"
Maya 4.5 is now set-up!